Your exchange program in the U.S. is an incredible adventure, but there’s one important responsibility you can’t overlook: taxes.
If you are a J-1 Visa holder, you’re required to file a federal tax return for each calendar year you earn U.S. income during your exchange program. You might even get some of your taxes back as a refund, which is called a tax return.
We’ve created a timeline of what you’ll need to do for taxes throughout your program.
Disclaimer: InterExchange staff are not tax professionals. This guide provides basic information to help you understand your filing responsibilities as a J-1 exchange visitor. If you need more information about filing your taxes, consult the IRS or a tax professional with specific questions.
During your exchange
- Fill out a W-4 Form.
- Review your first paystub.
- Update your contact details with your employer.
After your exchange
- Receive your W-2 Form by January 31 of the following calendar year (e.g., January 31, 2026 for income earned during the 2025 calendar year)
- Complete your federal tax return by April 15.
- Complete your state tax return by April 15.
- Receive your refund.
- Keep all your paperwork.
Important note: TurboTax and similar online tax software do not support non-resident tax forms, and filing as a U.S. resident with online tax software may cause the IRS to suspect you of tax fraud.
During your exchange
1. Fill out a W-4 form.
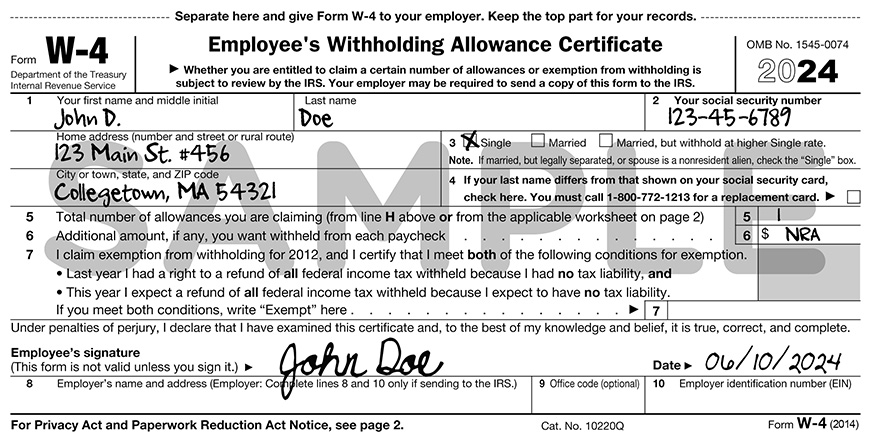
When you arrive in the U.S., your host employer will give you a W-4 Form. Based on the information you provide on the W-4, your taxes will be calculated and deducted from your paycheck. You must fill this form out and give it back to your employer to get paid.
The W-4 Form helps your host employer estimate how much tax you will owe the government based on your projected earning for the current calendar year. Each pay period, your host employer will withhold a prorated amount of your income so that you don’t have to pay a big tax bill after the year is over.
Based on your individual circumstances, your actual tax bill is likely to be different from the amount withheld by your host employer. If you’ve paid more than necessary, the government will issue a tax refund.
W-4 Forms are designed for U.S. residents, not for visitors. So, there are a few special instructions you need to follow:
- Box 1: This should reflect your U.S. address, not permanent home-country address, since the W-4 is for payroll.
- Box 2: Enter your Social Security number if you already have it. If you do not have your number yet, inform human resources at your host company that you applied for a number, and provide a copy of your receipt.
- Box 3: Mark or check “Single,” even if you are married.
- Box 4: Leave blank.
- Box 5: Write “1” (If you are a resident of Canada, Mexico, Japan, or South Korea, or India, please visit the IRS website for further instructions.)
- Box 6: J-1 Visa holders should follow IRS Notice 1392 for nonresident aliens:
- Check “Single” marital status
- Write “Nonresident Alien” above Step 1(c)
- Do not complete Steps 2–4(b)
- Use Step 4(c) to enter any additional withholding if required. (Most J-1 Visa holders will leave this blank.)
- Box 7: Leave blank.
Sign and date your form - Box 8-10: Leave blank.
Do not complete the Personal Allowances Worksheet; this does not apply to exchange visitors.
2. Review your first paystub.
Once you give your employer your W-4 and you start your program, you’ll receive your first paycheck. The taxes will already be taken out of your pay. It’s important to review your paycheck to make sure you are paying the right taxes.
| You Do Pay | You Do Not Pay |
| Federal Income Tax | Medicare Tax (FICA) |
| Local or City Income | Social Security Tax (S.S.) |
| State Income Tax | Federal Unemployment Tax (FUTA) |
*Please note: Some states may deduct state unemployment taxes, which you are required to pay.

Your paystub may look a little different, but it typically includes these items:
- Gross Pay: Total amount earned in the pay period before any tax deductions.
- Deductions or Withholdings: Amount of money the federal, state, and local governments take out of your paycheck
- Net Pay: Total amount of earnings you will receive after taxes have been taken out.
- Year To Date (YTD): The total amount of earnings and withholdings since January 1st of the current calendar year.
If you see deductions that say FICA, FUTA, S.S., or Social Security, please notify your employer and ask for a refund. If your employer is unable to issue a refund, contact the IRS and request Form 843.
3. Update your contact details with your employer.
At the end of your exchange program, give your employer your permanent address in your home country. Make sure this is a good address for receiving mail. Ask your employer if they need a prepaid, pre-addressed envelope. Your employer will need it to send you your W-2 Form, which is the form you use to file your tax return with the government.
After Your Exchange
1. Receive your W-2 form.
Your W-2 Form summarizes your earnings and taxes withheld from you the previous year. Your employer will mail your W-2 Form to you by January 31. If you do not receive it by February 15 of the year following your employment, contact your host employer immediately.

2. Complete your federal tax return.
After you receive your W-2, fill out a 1040-NR (Non-Resident Alien) tax form. (Not 1040 or 1040EZ.) This form is only available online on the IRS website. It is no longer distributed at embassies.
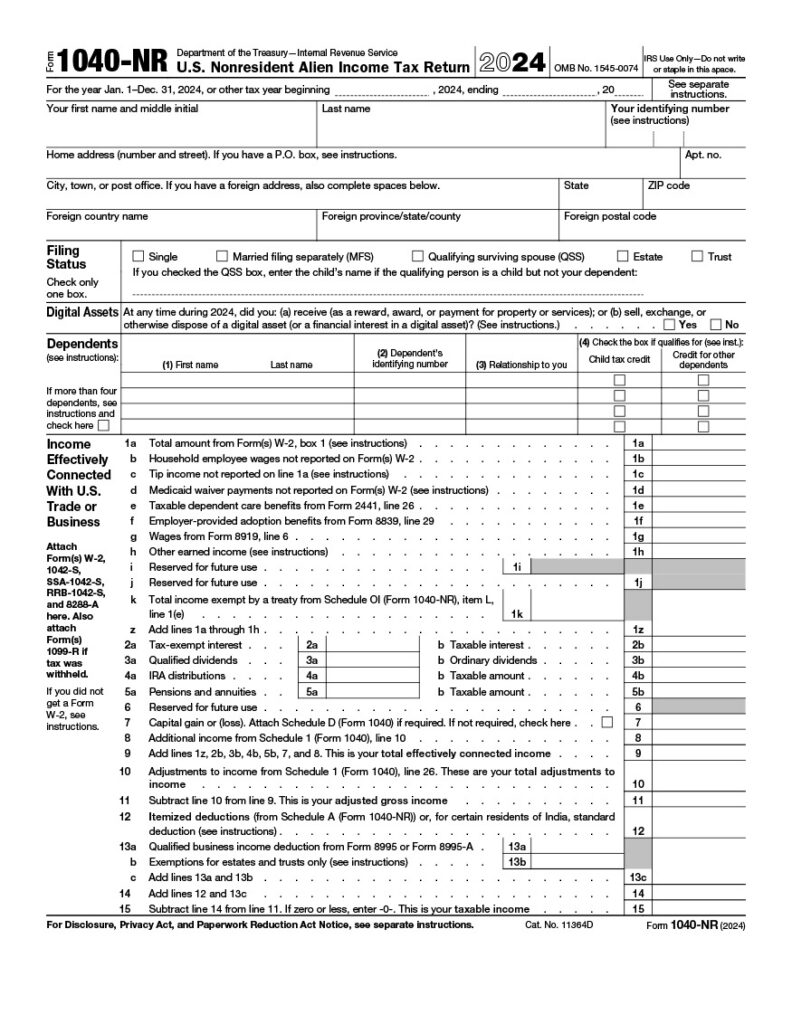
When you begin the 1040-NR Form, make sure to read the instructions. To avoid any mistakes, follow the instructions carefully.
If you paid too many taxes to the U.S. government, they will issue you a refund. If you did not pay enough taxes, you must pay the government the amount you still owe.
One way to submit your 1040-NR Form is by mail. Before mailing it in, keep a copy of it and all of your tax documents. You can send your form to the IRS branch that handles returns for the state in which you lived.
The deadline to mail your taxes is generally April 15 of the calendar year following your employment. The sooner you complete your taxes, the sooner you receive your tax refund, if eligible!
It’s important to note that, if your employment spans two separate calendar years, this process will need to be repeated in 12 months.
3. Complete your state tax return.
There are separate forms for state and local taxes, but they vary by state. State tax forms are obtained from the state tax agency (not the employer) or you can find them here. They are not available at the embassy. State taxes must be filed separately. The IRS website has more information on filing taxes in your host state.
4. Receive your refund.
If you are owed a refund, you will be given a paper check issued by the U.S. Government. Keep in mind that you may not be able to cash this check in your home country.
You may have the option to receive a refund via direct deposit rather than a paper check You will need to have an active U.S. bank account when the IRS processes the return, so consider leaving your U.S. bank account open until your refund can be received. Check with your bank about any fees that may be incurred while your U.S. bank account is inactive, and check with your home country bank to determine what other options you have if necessary.
5. Keep all your paperwork.
Store your tax paperwork in a safe place and make electronic copies as backups.
Note for those who leave the U.S. before tax season: You can still file your U.S. taxes from abroad. Make sure to keep a copy of your W-2 and maintain access to your email and U.S. bank account if you’re expecting a refund.