The J-1 Visa
The Purpose of the J-1 Visa
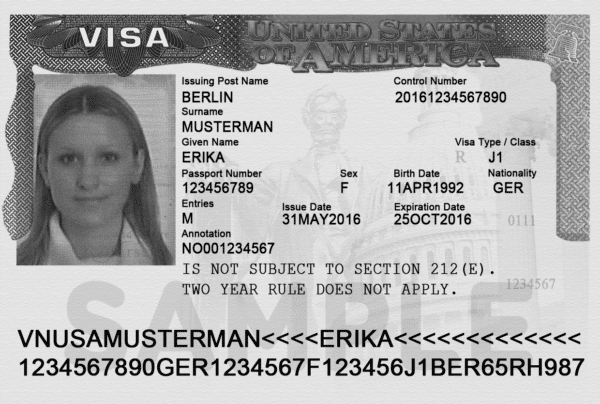
The J-1 Visa is a sticker added to your passport by a U.S. Embassy or Consulate in your home country. The J-1 Visa allows you to enter the U.S. when you present it with your printed DS-2019 Form at U.S. Customs & Border Protection upon arrival. You cannot obtain a J-1 Visa stamp within the U.S; it must be obtained in your home country. It is generally valid for one, two or multiple entries into the U.S., and it has an expiration date, which may or may not be the same as your program end date.
The Intern/Trainee J-1 Visa (together with your DS-2019 Form) allows you to:
- Intern/Train in the U.S. during the dates listed on your DS-2019 Form for the host employer approved by InterExchange Career Training USA.
- Apply for a Social Security number.
This visa does not allow you to:
- Perform unskilled labor or provide patient or child care.
- Extend your work eligibility or program participation past 12 months for interns or hospitality trainees or past 18 months for all other trainees.
- Intern/train for more than one host employer at the same time or obtain a second job.
- Intern/train for fewer than 32 hours a week or perform more than 20 percent clerical work.
The expiration date on your J-1 Visa is the last day you may enter the U.S., not the last day you can intern/train.
Applying for the J-1 Visa
Once you’ve been accepted into the Career Training USA program, your next step is to apply for a J-1 Visa at the U.S. embassy or consulate in your country. ALL Interns and Trainees (except Canadian citizens—please see the end of this section) must attend an embassy interview in order to receive a J-1 Visa.
Step 1. Print Your Necessary Paperwork
You should have received an email from InterExchange entitled “APPLICATION APPROVED/SEVIS FEE PAYMENT INFORMATION.” This email includes your SEVIS ID number as well as instructions on accessing and printing your DS-2019, DS-7002 Training Plan, and SEVIS fee payment receipt. These items are necessary for completing the DS-160 Non-immigrant visa application. You are required to take printed forms with you to the embassy; they will not accept digital forms on your phone.
Step 2. Complete the DS-160 online.
Once you’ve reviewed your approval email, head to the Department of State’s Consular Electronic Application Center to complete and submit the DS-160 Non-immigrant visa application.
Note: The Department of State requires all Visa Applicants to submit their social media handles (including, but not limited to, Facebook, Twitter, and Instagram) on their DS-160 Applications. A response to the questions related to social media is required. However, the form does allow the applicant to respond with “None.”
Applicants should complete the application fully and honestly as failure to provide accurate and truthful responses on a visa application or during a visa interview may result in denial of the visa by a consular officer. At present, you will not be asked for your passwords or to update any of your current privacy settings.
Step 3. Schedule your visa interview.
- Find the nearest U.S. Embassy or Consulate that issues J-1 Visas.
- Navigate to their nonimmigrant visa page to access the appropriate appointment scheduling link
- You should review the embassy or consulate’s website for any country-specific information, including instructions about scheduling interviews, submitting your visa application, and other frequently asked questions.
- You will need to pay the required visa fee before you will be able to schedule an appointment.
- You may qualify for an interview waiver if you previously held a nonimmigrant visa (except for a B visa) and are applying within 48 months of the visa’s expiration date. You must apply in your country of nationality or residence, and cannot have been refused a visa in the past. Waivers are granted at the embassy’s discretion, so please refer to specific embassy instructions.
Requesting an Emergency/Expedited Interview Appointment at the U.S. Embassy/Consulate
If U.S. Embassy/Consulate interview wait times in your home country are longer than usual or if there are no available appointments before the program start date on your DS-2019, you may have the option to request an emergency/expedited appointment. Instructions and qualifications for requesting an emergency appointment vary by embassy. Please visit the embassy’s website for specific requirements, but we’ve outlined the usual steps below.
- Complete the DS-160 Visa Application and pay the visa application fee.
- Schedule an appointment online for the earliest available date. Typically you’re required to have an appointment scheduled before you can request an expedited date.
- Contact the embassy to request an expedited appointment, following your embassy’s specific instructions for submitting this request. Instructions for making an expedited appointment request are typically found in the Frequently Asked Questions section of the Official U.S. Department of State Visa Appointment Service website. If your country is not listed on the link above, instructions may be available at USTravelDocs. NOTE: For emergency appointment qualifications, J-1 Intern/Trainee Visas typically fall under the “student or exchange visitors category.”
- Wait for a response from the embassy.
The decision to grant or deny an emergency appointment request is at the discretion of the embassy, and often depends on the availability of embassy resources. If you are denied an emergency appointment, you are typically required to keep your initial appointment date. However, you should continue to monitor the embassy’s scheduling website to see if any earlier non-emergency appointments become available.
Contact InterExchange if your emergency appointment is denied and your arrival in the U.S. will be delayed.
Step 4. Attend your embassy interview!
- Review our tips for preparing for your interview.
- Gather required documents as specified by the embassy. Remember to bring your printed DS-2019 and DS-7002 with you to the embassy, as well as any additional documents specified on the embassy or consulate website.You will also need documented proof of ties to your home country or country of residency (documents may show you will return to school, have a job offer after your program, own property, etc.) After a successful visa interview, the embassy will generally return your passport with your J-1 Visa inside within about five days.
- If your interview was not successful, the consular official will let you know that your visa request has been denied. If your visa is denied, please let InterExchange know as soon as possible. Depending on the reason for the denial, you may be able to try reapply. InterExchange will discuss your options with you and provide instructions on attending a second visa interview if you decide to apply again.
- InterExchange allows a maximum of two interview attempts at the embassy. If your visa is denied a second time by the embassy, then we will unfortunately need to cancel your application.
Canadian Citizens
Canadian citizens are exempt from an embassy/consulate interview and will not need a J-1 Visa to enter the U.S. Follow the steps below to prepare for your trip to the U.S.
- Review and follow Step 1 above. Please be sure to print and sign your DS-2019 Form. You will also need to print your DS-7002 and SEVIS fee payment receipt.
- Present your printed documents to customs officials when entering the U.S.
A J-1 Visa is not required for Canadian citizens. However, when entering the U.S. to begin your program, you will need to present printed copies of your DS-2019, DS-7002, and SEVIS fee payment receipt. Customs officials will review these documents along with your passport before granting you admission to the U.S. under J-1 status.
How Long Does it Take to Get a J-1 Visa?
Understanding the J-1 Visa process and the time it takes to be approved can be the difference between a relatively easy process and a last-minute rush filled with anxiety. Here at InterExchange, we want you to be as prepared as possible. On average, it takes six to eight weeks to apply for and be approved for a J-1 Visa.
Here is a breakdown of the process and estimated timing for each:
Completing an application (7-14 days)
Both you and your host employer will need to complete an application with InterExchange and provide the necessary documents.
InterExchange Initial Review (1-2 days)
During this time, InterExchange will check your application to ensure it is complete and contact you for any missing documents. If documents are missing, this can delay the process.
InterExchange Full Review (10 days)
InterExchange has a 10-day review period once an application has been deemed complete. During this time, we will contact you to conduct a brief interview over Skype or Google Meet.
Embassy Interview (1-2 weeks)
Wait times for interviews can vary depending on the city and time of year. Please keep in mind that you will need your documents from InterExchange for the interview so scheduling in advance is not possible.
Issuance of Visa (3-7 days)
It can take up to a week for the embassy to return your passport to you with your new visa.
InterExchange does have an expedite option! For an additional charge, the full review can be done in just 3 days!
InterExchange prides itself on keeping costs low and reviewing applications as quickly as possible. We are here to help you with the process, so please contact us with any questions you have. Good luck in your internship!